- Simulador web de Sensor HAT (ya tiene led y sensores integrados): https://trinket.io/library/trinkets/5b83aa39e6 Es mas simple pero para probar algunos comandos está piola. La desventaja es que no se puede instalar cualquier librería. Sirve como una primera aproximación a una Raspberry Pi.
Para simular la Raspberry se puede usar VirtualBox e instalar una maquina con Raspbian, o en Windows directamente usar Qemu. Para mi anda mejor VirtualBox porque le podes asignar más memoria ram al emulador. Mas informacion de como instalar la máquina virtual aqui
Para tener copy paste entre el sistema anfitrión y la maquina virtual, insertar el cd de adicionales desde el menu Devices y luego en una terminal:
$ sh /media/cdrom/VBoxLinuxAdditions.run
- RPi.GPIO Installation
$ sudo apt-get update $ sudo apt-get install python-rpi.gpio python3-rpi.gpio - Adafruit_Python_DHT Installation
Python 3:
$ sudo apt-get install python-pip $ sudo python -m pip install --upgrade pip setuptools wheel $ sudo pip install Adafruit_DHT$ sudo apt-get install python3-pip $ sudo python3 -m pip install --upgrade pip setuptools wheel $ sudo pip3 install Adafruit_DHT - Luma.LED_Matrix: Display drivers for MAX7219, WS2812, APA102
$ sudo usermod -a -G spi,gpio pi $ sudo apt-get install build-essential python-dev python-pip libfreetype6-dev libjpeg-dev $ sudo -H pip install --upgrade --ignore-installed pip setuptools $ sudo -H pip install --upgrade luma.led_matrix - Luma.Examples
Log out y volver a entrar. clonar repo:
$ sudo usermod -a -G i2c,spi,gpio pi $ sudo apt install python-dev python-pip libfreetype6-dev libjpeg-dev build-essential $ sudo apt install libsdl-dev libportmidi-dev libsdl-ttf2.0-dev libsdl-mixer1.2-dev libsdl-image1.2-devInstalar las librerias:$ git clone https://github.com/rm-hull/luma.examples.git $ cd luma.examplesCorrer ejemplos:$ sudo -H pip install -e .(esto último solo andará en una verdadera Raspberry Pi, ya que hace uso de los sensores y dispositivos que el emulador no posee a priori. Para ello dirigirse al final de este documento.)$ python luma.examples/examples/3d_box.py
- Pinout: https://github.com/splitbrain/rpibplusleaf
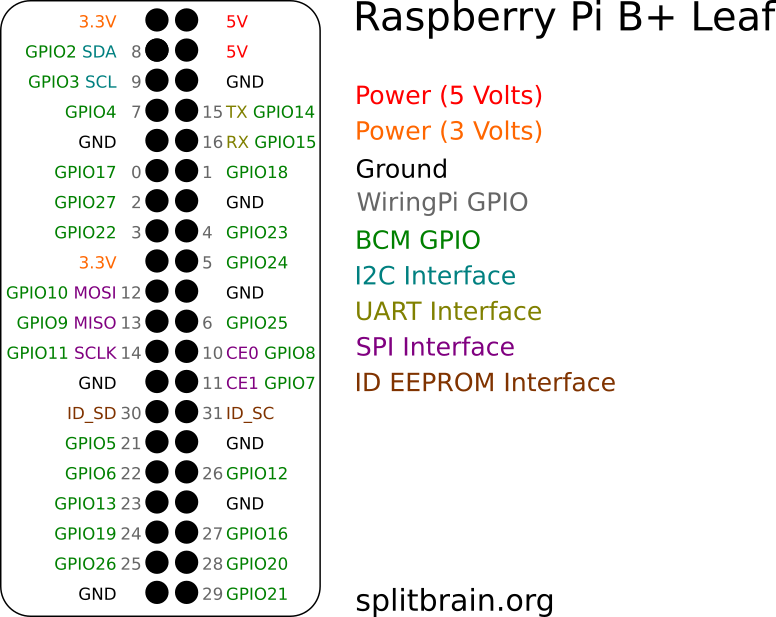
- Interactivo: https://pinout.xyz/pinout/pin33_gpio13
- Uso Basico (esto lo vamos a usar para el microfono):
https://sourceforge.net/p/raspberry-gpio-python/wiki/BasicUsage/
https://www.raspberrypi.org/documentation/usage/gpio/
import RPi.GPIO as GPIO

GPIO.setmode(GPIO.BOARD)
  # or
GPIO.setmode(GPIO.BCM)

GPIO.setup(channel, GPIO.IN)

# Read
GPIO.input(channel)

# Set
GPIO.output(channel, state)

# Poll
if GPIO.input(channel):
    print('Input was HIGH')
else:
    print('Input was LOW')

# To wait for a button press by polling in a loop:
while GPIO.input(channel) == GPIO.LOW:
    time.sleep(0.01)  # wait 10 ms to give CPU chance to do other things

# To clean up at the end of your script:
GPIO.cleanup()
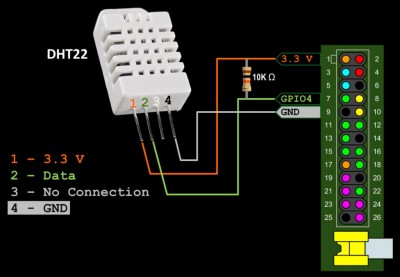
https://github.com/adafruit/Adafruit_Python_DHT/blob/master/examples/simpletest.py
import Adafruit_DHT
sensor = Adafruit_DHT.DHT22
pin = 23

hum, temp = Adafruit_DHT.read_retry(sensor, pin)https://luma-led-matrix.readthedocs.io/en/latest/python-usage.html#x8-led-matrices https://github.com/rm-hull/luma.examples
from luma.core.interface.serial import spi, noop
from luma.led_matrix.device import max7219
from luma.core.render import canvas
from luma.core.legacy import text, show_message
from luma.core.legacy.font import proportional, CP437_FONT, TINY_FONT, SINCLAIR_FONT, LCD_FONT
from luma.core.virtual import viewport

serial = spi(port=0, device=0, gpio=noop())
device = max7219(serial, cascaded=2, block_orientation=-90)
device.contrast(0x05)
msg = 'asd'
# para mostrar un mensage que vaya pasando usar show_message:
show_message(device, msg, fill="white", font=proportional(LCD_FONT), scroll_delay=0.05)

# para mostrar un mensaje estático usar draw y time para ir actualizándolo:
while True: # o import repeat y repeat(None).
    time.sleep(1)
     msg = time.asctime()
     msg= time.strftime("%H%M")
     with canvas(device) as draw:
         text(draw, (1, 0), msg, fill="white")
    time.sleep(2)
pass # ???- para dibujar en las celdas y obtener el codigo: http://dotmatrixtool.com/
Primero instalamos Luma.emulation
$ sudo apt install python-dev python-pip build-essential
$ sudo apt install libsdl-dev libportmidi-dev libsdl-ttf2.0-dev libsdl-mixer1.2-dev libsdl-image1.2-dev
$ sudo pip install --upgrade luma.emulator
(recordar hacer lo mismo con python3 y pip3)
Hay que correr los archivos con unos parámetros especiales. Los más importantes son:
   --display DISPLAY, -d DISPLAY
                        Display type, supports real devices or emulators.
                        Allowed values are: ssd1306, ssd1309, ssd1322,
                        ssd1325, ssd1327, ssd1331, ssd1351, sh1106, pcd8544,
                        st7735, ht1621, uc1701x, st7567, max7219, ws2812,
                        neopixel, neosegment, apa102, capture, gifanim,
                        pygame, asciiart, asciiblock (default: ssd1306)
De estas opciones notar:
- max7219: Este es cuando tengamos el dispositivo real.
- capture: Este saca una instanteanea de lo que mostraria el display y lo guarda como png.
- gifanim: Este es como capture pero guarda un gif animado.
- pygame: Este muestra el output en una ventana en tiempo real
Seguimos con los parametros restantes
   --width WIDTH         Width of the device in pixels (default: 128)

   --height HEIGHT       Height of the device in pixels (default: 64)

   --rotate ROTATION, -r ROTATION
                     Rotation factor. Allowed values are: 0, 1, 2, 3
                     (default: 0)
   --transform TRANSFORM
                     Scaling transform to apply (emulator only). Allowed
                     values are: identity, led_matrix, none, scale2x,
                     seven_segment, smoothscale (default: scale2x)
    --scale SCALE         Scaling factor to apply (emulator only) (default: 2)
El codigo hay que cambiarlo un poco:
# from luma.core.interface.serial import spi, noop
# from luma.led_matrix.device import max7219
from luma.core.legacy import text, show_message
from luma.core.legacy.font import proportional, CP437_FONT, TINY_FONT, SINCLAIR_FONT, LCD_FONT
from demo_opts import get_device

# comentar las lineas:
# serial = spi(port=0, device=0, gpio=noop())
# device = max7219(serial, cascaded=2, block_orientation=-90)

device = get_device()

msg = 'Aguante Python y la UNLP 2k19'
show_message(device, msg, fill="white", font=proportional(LCD_FONT), scroll_delay=0.05)
Y ejecutarlo con los parámetros:
$ python luma.examples/examples/archivito.py --display pygame --transform led_matrix --width 16 --height 8

| Nota: ya que hay que usar las librerías demo lo mas facil es meter el archivo en la carpeta luma.examples/examples que se creó cuando clonamos el git |
|---|