| marp | true |
|---|---|
| title | Programming 2 |
| author | Benjamin Wilking |
| theme | uncover |
| style | section { font-size: 30px } |
| class | invert |
| paginate | false |
| math | mathjax |

<style scoped> section{ font-size: 20px; } </style>
- Literature
- Exercises@Home & Exam
- Preparations for Every Lesson
- From C to C++
- Testing Code & Test Driven Development
- Dynamic Memory in C & C++
- Inheritance
- The static Keyword
- clang-tidy Coding Support
- Polymorphism
- Templates
- STL
- Type Casting
- Exceptions
- doxygen Code Documentation
- C++ Library Example - OpenCV
- Programming Task - Weather in Konstanz
- Programming Task - Uncertainty Ellipse
- Homework is voluntary but strongly recommended.
- You are welcome to ask questions, I'm glad to help.
- During the last 3 weeks of the course.
- In teams of up to 3 people (2 preferred).
- Delivery in Git.
Complexity is increasing very fast, so make sure to
- maintain a working repository (preferably on GitHub)
- CMake is mandatory
- add our code from the lessons to this repository
- try to evolve your Git capabilities
- keep a continuous integration running on the repository (only with GitHub)
- finish the tasks from the lessons at home
- stick to coding conventions (clang-format, clang-tidy, doxygen)
# define the project name
project(basics_in_Cpp VERSION 1.0 LANGUAGES CXX)

# define the c standard version
set(CMAKE_CXX_STANDARD 14)
set(CMAKE_CXX_STANDARD_REQUIRED True)In order to tell CMake and the compiler you should use the following file names:
*.cpp for all source files
*.h and *.hpp for all header files
#include <iostream>

auto main() -> int // see also "trailing return type"
{
    std::cout << "Hello World" << std::endl;

    return 0;
}// old C-Style
typedef struct
{
....
}MyCppStruct;
// modern C++-Style
using MyCppStruct = struct
{
....
};using MyCppStruct = struct
{
int16_t a = 0; // type from cstdint https://en.cppreference.com/w/cpp/types/integer
float b = 0.0F;
void print() const
{
std::cout << "a = " << a << "; b = " << b << std::endl;
}
};
auto main() -> int
{
MyCppStruct my_struct;
std::cout << "Printing struct my_struct: " << std::endl;
my_struct.print();
}class MyCppClass
{
public: // C++ Access Specifiers
int16_t a = 0;
float b = 0.0F;
void print() const
{
std::cout << "a = " << a << "; b = " << b << std::endl;
}
};
auto main() -> int
{
MyCppClass my_class;
std::cout << "Printing class my_class: " << std::endl;
my_class.print();
}class MyCppClass
{
// publics are accessible from outside the class
public:
float pub_member_var = 0.0F; // public member variable
void pub_member_func(){} // public member function (method)
// Constructor: A constructor in C++ is a special method that is
// automatically called when an object of a class is created.
MyCppClass();
// There is also a destructor, but we don't use it for now
~ MyCppClass();
// privates cannot be accessed (or viewed) from outside the class
private:
float priv_member_var = 0.0F; // private member variable
// protected elements cannot be accessed from outside the class,
// but can be accessed in inherited classes.
protected:
void prot_member_func(){} // protected member function (method)
};Class declaration ➡️ normally goes into the header file
class Student
{
   public:
    int16_t num_of_exams = 0;
    int32_t id_number;
    std::string name;
    // define a constructor
    Student(std::string par_name, int32_t par_id);
    void print() const;
};Class definition ➡️ normally goes into the cpp file
Student::Student(std::string par_name, int32_t par_id) : name{par_name}
{
    /*
        Initialization can be done
        1. directly in the declaration
        2. in the initializer list of the constructor definition
        3. in the constructor itself
    */
    id_number = par_id;
}
void Student::print() const
{
    // print code goes here!
}Take the "student" example from above and ...
- add a private member for the bank account number
- extend the constructor to initialize the bank account number
- write an update_bank_account method to update the bank account number
- implement the print method
You can find the code for this exercise in the file struct_to_class.cpp
namespace my_awesome_namespace
{
class AwesomeClass
{
   public:
    int16_t a = 0;  // type from cstdint https://en.cppreference.com/w/cpp/types/integer
    float b = 0.0F;

    void print() const
    {
        std::cout << "a = " << a << "; b = " << b << std::endl;
    }
};
}  // namespace my_awesome_namespace

auto main() -> int
{
    my_awesome_namespace::AwesomeClass my_class;
    my_class.print();
}
namespace my_awesome_namespace
{
  ....
}  // namespace my_awesome_namespace

namespace my_awesome_namespace
{
namespace my_more_awesome_namespace
{
class MoreAwesomeClass
{
   public:
    static void print_hello()
    {
        std::cout << "hello from a static class method in namespace" << std::endl;
    }
};
};  // namespace my_more_awesome_namespace
}  // namespace my_awesome_namespace

auto main() -> int
{
    my_awesome_namespace::my_more_awesome_namespace::MoreAwesomeClass::print_hello();
}The keyword using simplifies things a lot.
using namespace std
[...]
cout << "Hello World" << endl;- ⚡ NEVER ⚡ put
usinginto a header file - you MIGHT put it into the source file carefully
- prefer namespace aliases (only in source files)
namespace fbz = foo::bar::baz;
A reference variable is an alias, that is, another name for an already existing variable. A reference, like a pointer, is also implemented by storing the address of an object. [geeksforgeeks]
int i = 3;
int a = 10;
// A pointer to variable i or "stores the address of i"
int *ptr = &i;
// A reference (or alias) for i.
int &ref = i;
// reassignment
ptr = &a;  // that's fine
&ref = a;  // ERROR as we should declare and initialize references at single step
// this means: also re-initialization is not possibleclass MyTestClass
{
public:
int test_member = 0;
};
void function_with_copy(MyTestClass mtc)
{
mtc.test_member = 1;
}
void function_with_reference(MyTestClass &mtc)
{
mtc.test_member = 1;
}
void function_with_pointer(MyTestClass *mtc)
{
mtc->test_member = 2;
}

<style scoped> section{ font-size: 25px; } </style>
| References | Pointers | |
|---|---|---|
| Reassignment | The variable cannot be reassigned in Reference. | The variable can be reassigned in Pointers. |
| Memory Address | It shares the same address as the original variable. | Pointers have their own memory address. |
| Work | It is referring to another variable. | It is storing the address of the variable. |
| Null Value | It does not have null value. | It can have value assigned as null. |
Refer to geeks4geeks for more details
Test-driven development (TDD) is a software development process relying on software requirements being converted to test cases before software is fully developed, and tracking all software development by repeatedly testing the software against all test cases. (wikipedia)
- What are your requirements? What do you want to achieve?
- Write your tests (using a test framework)
- Write the most simple code to pass the tests
- Improve your code to pass all tests
- Beautify the code

googletest is a testing framework developed by the Testing Technology team with Google’s specific requirements and constraints in mind. Whether you work on Linux, Windows, or a Mac, if you write C++ code, googletest can help you. (googletest)
- You only can test libraries, not executables
- googletest is a C++ library, so we have to use C++ for our tests
- add googletest to your CMakeLists.txt
- write your tests
- Run your tests
# enable the testing
enable_testing()
# check if we have gtest
find_package(GTest REQUIRED)
# include the gtest CMake stuff
include(GoogleTest)
# create a test executable
add_executable(tests test/test_functions.cpp)
# link the gtest libraries
target_link_libraries(tests PRIVATE GTest::GTest GTest::Main)
# link the library we want to test
target_link_libraries(tests PRIVATE tdd_functions_lib)
# add the include directories
target_include_directories(tests PUBLIC include)
# discover and add tests to the test list
gtest_discover_tests(tests)#include "gtest/gtest.h" // include the gtest functions & macros
#include "functions.h"
// the first test we want to write
TEST (tdd_tests, add_standard_integers) {
EXPECT_EQ (11, add_integers(5,6));
}after compiling everything you have two possibilities:
cd <build_folder>
run ctest
or
run the created test target ./tests
Since you might have multiple test executables using the ctest command has significant advantages in continuous integration.
Let's take a look at Gtest in action by inspecting the corresponding code of this chapter
Start working on the Homework 2-1
Every instantiated variable is allocated on the stack. The stack memory is very limited in size. If more memory is needed, the solution is to use the heap memory instead.
- malloc Allocates memory on the heap and returns a pointer to this memory
- calloc Allocates memory for an array of num objects of size and initializes all bytes in the allocated storage to zero.
int num_of_elements = 5;

// Dynamically allocate memory using malloc()
int* mal_ptr = (int*)malloc(num_of_elements * sizeof(int));
// do some stuff
// free the memory again
free(mal_ptr);

// Dynamically allocate memory using calloc()
int* cal_ptr = (int*)calloc(num_of_elements, sizeof(int));
// do some stuff
// free the memory again
free(cal_ptr);// BAD EXAMPLE -- MEMORY LEAK
int* ptr2 = NULL;
for (int i = 0; i < noe; i++)
{
ptr2 = (int*)calloc(100000, sizeof(int));
}
free(ptr2);Write a small C program to
- read in a number as size of an array.
- create an array by allocating the corresponding amount of memory.
- initialize the elements of the array with numbers from 1 to size
- print the elements of the array to the terminal.
You can find the code for this exercise in the file dynamic_memory.c
The OLD way of allocating memory in C++ is quite similar to C.
Instead of using malloc and free, C++ provides the functions
new and delete
int num_of_elements = 5;

// Allocate memory for a single value
int* single_ptr = new int;
// Allocate memory for an array
int* arr_ptr = new int[num_of_elements];
// do some stuff
// free the memory again
delete single_ptr;
delete[] arr_ptr; // Be aware of the [] in case of an array
Write a small C++ program to
- read in a number as size of an array.
- create an array by allocating the corresponding amount of memory.
- initialize the elements of the array with numbers from 1 to size
- print the elements of the array to the terminal.
You can find the code for this exercise in the file dynamic_memory_old.cpp
The NEW way of allocating memory in C++ is quite different to the old style.
Instead of using new, C++14 and later provides smart pointers.
Smart pointers are used to make sure that an object is deleted if it is no longer used (referenced).
void my_func_w_leak()
{
    int* valuePtr = new int(15);  // create a new int and initialize it with "15"
    int x = 45;
    if (x == 45) return;  // here we have a memory leak, valuePtr is not deleted
    delete valuePtr;
}
//---------------------
void my_func_wo_leak()
{
    std::unique_ptr<int> valuePtr(new int(15));  // create a new int and initialize it with "15"
    int x = 45;
    if (x == 45) return;  // no memory leak anymore!
}std::unique_ptr is a smart pointer that owns and manages another object through a pointer and disposes of that object when the unique_ptr goes out of scope. [unique_ptr]
// creating a unique_ptr
std::unique_ptr<int> uni_ptr(new int); // single value
std::unique_ptr<int[]> array_uni_ptr(new int[5]); // array of size 5
std::unique_ptr<int> make_uni_ptr = std::make_unique<int>(); // single value
std::unique_ptr<int[]> make_array_uni_ptr = std::make_unique<int[]>(5); // array of size 5
// we can also use "auto" here
auto auto_uni_ptr = std::make_unique<int>();
// accessing an element of an array inside a unique_ptr
array_uni_ptr.get()[0] = 5;std::shared_ptr is a smart pointer that retains shared ownership of an object through a pointer. Several shared_ptr objects may own the same object. [shared_ptr]
// creating a shared_ptr
std::shared_ptr<int> shr_ptr(new int); // single value
std::shared_ptr<int[]> array_shr_ptr(new int[5]); // array of size 5
std::shared_ptr<int> make_shr_ptr = std::make_shared<int>(); // single value
std::shared_ptr<int[]> make_array_shr_ptr = std::make_shared<int[]>(5); // array of size 5
// we can also use "auto" here
auto auto_shr_ptr = std::make_shared<int>();
// accessing an element of an array inside a shared_ptr
array_shr_ptr.get()[0] = 5;Write a small C++ program to
- read in a number as size of an array.
- create an array by allocating the corresponding amount of memory using a unique_ptr.
- initialize the elements of the array with numbers from 1 to size
- print the elements of the array to the terminal.
You can find the code for this exercise in the file dynamic_memory_new.cpp
The capability of a class to derive properties and characteristics from another class is called Inheritance. Inheritance is one of the most important features of Object-Oriented Programming. [geeksforgeeks]
Inheritance is a feature or a process in which, new classes are created from the existing classes. The new class created is called “derived class” or “child class” and the existing class is known as the “base class” or “parent class”. [geeksforgeeks]
// Base class
class Shape
{
    [...]
};

// Derived class
class Rectangle : public Shape
{
    [...]
};class Shape
{
public: // C++ Access Specifiers
void set_width(int8_t width_in)
{
width_ = width_in;
}
void set_height(int8_t height_in)
{
height_ = height_in;
}
protected: // C++ Access Specifiers
int8_t width_;
int8_t height_;
};class Rectangle : public Shape
{
public:
auto get_area() -> int32_t
{
return (width_ * height_);
}
};auto main() -> int
{
Rectangle rect;
rect.set_width(5);
rect.set_height(7);
// Print the area of the object.
std::cout << "Total area: " << rect.get_area() << std::endl;
return 0;
}Extend the above Shape example by:
- add a child class for the shape triangle
- implement the get_area method corresponding to the rectangle shape
You can find the code for this exercise in the file inheritance.cpp
// Base class 1
class Shape
{
    [...]
};
// Base class 2
class PaintCost
{
    [...]
};
// Derived class
class Rectangle : public Shape, public PaintCost
{
    [...]
};Extend the above Shape example by:
- Implement the PaintCost base class by writing a method
get_cost(double area). The cost ist 70 times the area. - Derive the triangle shape also from PaintCost
- Calculate the painting costs and write it to the terminal
You can find the code for this exercise in the file multi_inheritance.cpp
Static is a keyword in C++ used to give special characteristics to an element. Static elements are allocated storage only once in a program lifetime in static storage area. And they have a scope till the program lifetime. [studytonight]
auto main() -> int
{
    for (int i = 0; i < 5; ++i)
    {
        int non_static_var = 0;
        static int static_var_ = 0;
        ++non_static_var;
        ++static_var_;
        std::cout << "non_static_var: " << non_static_var << " static_var_: " << static_var_ << std::endl;
    }
    return 0;
}
Output:
non_static_var: 1 static_var_: 1
non_static_var: 1 static_var_: 2
non_static_var: 1 static_var_: 3
non_static_var: 1 static_var_: 4
non_static_var: 1 static_var_: 5void function_with_static()
{
static int call_count_ = 0;
++call_count_;
std::cout << "call_count in function: " << call_count_ << std::endl;
}
auto main() -> int
{
function_with_static(); // --> output: call_count in function: 1
function_with_static(); // --> output: call_count in function: 2
return 0;
}class ClassWithStatics
{
public:
static int instance_counter_;
ClassWithStatics()
{
++instance_counter_;
std::cout << "Instance count is: " << instance_counter_ << std::endl;
}
};
int ClassWithStatics::instance_counter_ = 0;
auto main() -> int
{
ClassWithStatics cws1; // --> output: Instance count is: 1
ClassWithStatics cws2; // --> output: Instance count is: 2
return 0;
}class ClassWithStatics
{
public:
static void say_hello()
{
std::cout << "Hello World! from static method" << std::endl;
}
};
auto main() -> int
{
// call function without object
ClassWithStatics::say_hello(); // --> output: Hello World! from static method
// also possible, but unusual
ClassWithStatics cws1;
cws1.say_hello(); // --> output: Hello World! from static method
return 0;
}clang-tidy is a clang-based C++ “linter” tool. Its purpose is to provide an extensible framework for diagnosing and fixing typical programming errors, like style violations, interface misuse, or bugs that can be deduced via static analysis. [clang-tidy]
The configuration is normally located in a .clang-tidy file.
In this file we can configure which checks to perform.
E.g. we want to enable all modernize-[*] rules or we want to enforce CamelCase names for class names with
readability-identifier-naming.ClassCase: CamelCase
More details about the available rules can be found here
If not already done, install the clang tools to your codespace by editing your Dockerfile:
 RUN \
 # bring in latest clang toolchain
 wget https://apt.llvm.org/llvm.sh  \
 && sudo chmod +x llvm.sh \
 && sudo ./llvm.sh 16 all \
 && sudo rm llvm.sh
Install the VS Code extension cs128.cs128-clang-tidy. Ideally by adding it to your devcontainer.json Set the options for the extension in your .vscode/settings.json
    "clang-tidy.executable": "clang-tidy-16",
    "clang-tidy.fixOnSave": true,
    "clang-tidy.lintOnSave": true,
    "clang-tidy.compilerArgs": ["--config-file=.clang-tidy"]
Now, you are good to go 👍
When the same entity (function or object) behaves differently in different scenarios, it is known as Polymorphism in C++. [mygreatlearning]
In compile-time polymorphism, a function is called at the time of program compilation. We call this type of polymorphism as early binding or static binding.[mygreatlearning]
class Addition
{
   public:
    static auto add(const int8_t num_x, const int8_t num_y) -> int32_t
    {
        return num_x + num_y;  // this function is performing addition of two integer value
    }
    static auto add(const string &str1, const string &str2) -> string
    {
        return str1 + str2;  // this function concatenates two strings
    }
};
auto main() -> int
{
    cout << Addition::add(3, 9) << endl;             // first method is called -> output: 12
    cout << Addition::add("Hallo", " Welt") << endl;  // second method is called -> output: Hallo Welt
    return 0;
}class A
{
string str_x_;
public:
explicit A(const string &str_i) : str_x_{str_i}{} //What is explicit? -> https://stackoverflow.com/a/121163
void operator+(const A &class_a)
{
string str_m = str_x_ + class_a.str_x_;
cout << "The result of the addition of two objects is : " << str_m << endl;
}
};
auto main() -> int
{
A ca1("Welcome");
A ca2(" Back");
ca1 + ca2; // overloaded operator is called -> output: Welcome Back
return 0;
}- Implement a base class Animal and two derived classes: one for Cat and one for Bird
- Implement the necessary + operators for Cat + Bird, Cat + Cat, Bird + Cat, and Bird + Bird
- Call all operators inside of a main
You can find the code for this exercise in the file polymorphism_exercise.cpp
In a Runtime polymorphism, functions are called at the time of the program execution. Hence, it is known as late binding or dynamic binding.[mygreatlearning]
class Animal {
   public:
    void function() const {
        cout << "Eating..." << endl;
    }
};
class Man : public Animal {
   public:
    void function() const {
        cout << "Walking ..." << endl;
    }
};
auto main() -> int {
    Animal animal = Animal();
    animal.function();  // parent class object -> output: Eating...
    Man man = Man();
    man.function();  // child class object -> output: Walking...
    return 0;
}
class ParentWVirtual {
   public:
    void non_virtual_display() const {
        cout << "Parent non_virtual speaking !!" << endl;
    }

    virtual void virtual_display() const {
        cout << "Parent virtual speaking !!" << endl;
    }
}; |
class DerivedWVirtual : public ParentWVirtual  {
   public:
    void non_virtual_display() const { // overridden function
        cout << "Derived non_virtual speaking !!" << endl;
    }

    void virtual_display() const override {
        cout << "Derived virtual speaking !!" << endl;
    }
}; |
auto main() -> int {
    DerivedWVirtual dwv;         // making object of derived class
    ParentWVirtual *pwv = &dwv;  // base class pointer. it can only access the base class members
    pwv->non_virtual_display();  // call the parent class method
    dwv.non_virtual_display();   // call the overriden derived class method
    pwv->virtual_display();      // call the overriden virtual derived class method via parent class pointer,
    dwv.virtual_display();       // call the overriden virtual derived class method via derived class
    return 0;
}
class ParentWPureVirtual
{
   public:
   // making the method pure virtual
    virtual void do_something() const = 0;
}; |
class ChildWPureVirtual : public ParentWPureVirtual
{
    public:
    void do_something() const override
    {
        cout << "ChildWPureVirtual is doing something!" << endl;
    }
}; |
auto main() -> int
{
    // ParentWPureVirtual ppv; // -> pure virtual, instantiation not possible
    ChildWPureVirtual cpv;
    cpv.do_something();
    return 0;
}- Add a pure virtual method
make_noiseto the Animal class - Override the make_noise method in the classes Cat and Bird
- Print out the corresponding noise for each class in the make_noise method
You can find the code for this exercise in the file polymorphism_exercise.cpp
A template is a simple yet very powerful tool in C++. The simple idea is to pass the data type as a parameter so that we don’t need to write the same code for different data types. [geeksforgeeks]
template <typename T>
auto my_max(T par_x, T par_y) -> T
{
    // that's an one-liner for if-else
    return (par_x > par_y) ? par_x : par_y;
}

auto main() -> int
{
    std::cout << my_max<int>(3, 7) << std::endl;
    std::cout << my_max<double>(3.0, 7.0) << std::endl;
    std::cout << my_max<char>('g', 'e') << std::endl;
    return 0;
}Implement a template function to check if two numbers are roughly the same:
- Parameter 1 and 2 are of type T, parameter 3 is the precision epsilon
- Return type is bool
- Compare some numbers of different types using your template
- optional: make sure that only arithmetic types are allowed in your template (static_assert)
You can find the code for this exercise in the file templates.cpp
The Standard Template Library (STL) is a software library originally designed by Alexander Stepanov for the C++ programming language [...]. It provides four components called algorithms, containers, functions, and iterators. [wikipedia]
We do not go into details here, so just take a look at our examples
Converting an expression of a given type into another type is known as type-casting. [cplusplus]
- Implicit Conversion
- Explicit Conversion
- dynamic_cast
- static_cast
- reinterpret_cast
- const_cast
Implicit conversions do not require any operator. They are automatically performed when a value is copied to a compatible type.
int8_t int_short = 127;
int32_t int_long = int_short; // implicit conversionC++ is a strong-typed language. Many conversions, specially those that imply a different interpretation of the value, require an explicit conversion.
int8_t int_short = 127;
int32_t int_long;
int_long = (int32_t)int_short;  // c-like cast notation
int_long = int32_t(int_short);  // functional notation
dynamic_cast can be used only with pointers and references to objects. Its purpose is to ensure that the result of the type conversion is a valid complete object of the requested class.
Therefore, dynamic_cast is always successful when we cast a class to one of its base classes:
class CBase
{
};
class CDerived : public CBase
{
};

CBase base;
CBase* pbase;
CDerived derived;
CDerived* pderived;

pbase = dynamic_cast<CBase*>(&derived);  // ok: derived-to-base
// pderived = dynamic_cast<CDerived*>(&base);  // wrong: base-to-derived
static_cast can perform conversions between pointers to related classes, not only from the derived class to its base, but also from a base class to its derived. [...] static_cast can also be used to perform any other non-pointer conversion that could also be performed implicitly.
double dpi=3.14159265;
int ipi = static_cast<int>(dpi);

class CBase
{
};
class CDerived : public CBase
{
};
CBase* base = new CBase;
auto derived = static_cast<CDerived*>(base);Re-use the result of the Animal-Cat-Bird exercise. Extend this exercise with the following functionality:
- Create a std::vector of type shared_pointer of Animal
- randomly add 10 Cat and Bird objects to this vector
- iterate over the animals vector and let them make a noise
You can find the code for this exercise in the file stl_and_casting_exercise.cpp
An exception is a problem that arises during the execution of a program. A C++ exception is a response to an exceptional circumstance that arises while a program is running, such as an attempt to divide by zero (tutorialspoint)
Always differentiate between Errors (assert) and Exceptions Take a look at this really good article!
Use asserts to check for errors that should never occur. Use exceptions to check for errors that might occur [...]. (microsoft)
Throwing an exception is quite easy:
throw std::logic_error("Test throwing an exception");
// compare to assertion
assert(my_variable==5);
To get a nice overview about exceptions, take a look at tutorialspoint
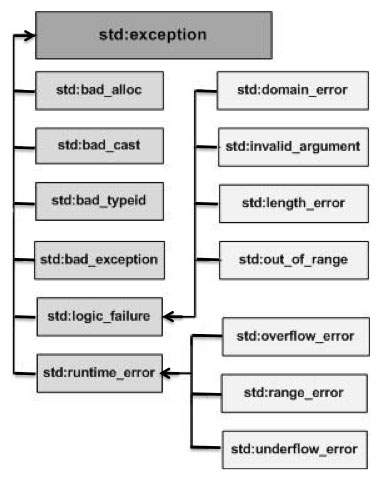
auto division(const int par_a, const int par_b) -> double {
    if (par_b == 0) {
        throw std::invalid_argument("Division by zero!");
    }
    return (static_cast<double>(par_a) / static_cast<double>(par_b));
}
auto main() -> int {
    int var_x = 50;
    int var_y = 0;
    double var_z = 0.0;
    try {
        var_z = division(var_x, var_y);
        std::cout << var_z << std::endl;
    }
    catch (std::invalid_argument& invalid_exception) {
        // in case of an "invalid_exception", we'll end up here
        std::cerr << invalid_exception.what() << std::endl;
    }
    return 0;
}Implement your own exception and write a small application to throw and catch this exception.
- Implement your own exception by defining the struct MyException.
- Derive MyException from std::exception.
- Override the
const char* what() constmethod to return your own exception message. - Throw your new exception in a short main and catch it.
You can find the code for this exercise in the file exceptions.cpp

Generate documentation from source code. Doxygen is the de facto standard tool for generating documentation from annotated C++ sources [doxygen]
Check out the example from our [learn2code 1 demo project](https://benniwi.github.io/learn2code_1_demo_project/html/index.html)
- The configuration is normally located in a Doxyfile file. Ideally it should be on top-level of your project
- Among others, the configuration contains the output directory, the graphs to generate , the files to include, and much more.
More details about the available rules can be found [here](https://www.doxygen.nl/manual/config.html). To start a new configuration from scratch, the [doxywizard](https://www.doxygen.nl/manual/doxywizard_usage.html) is a great help.
Install doxygen to your codespace by editing your Dockerfile:
sudo apt-get install -y doxygen graphviz(Check this link for installation on Mac ➡️ brew install doxygen)
Running doxygen is quite easy. Go to the location of your Doxyfile file and run:
doxygen DoxyfileIf you've done everything right, you should be able to open the file html/index.html with your browser 🎇.
To allow doxygen to collect all the documentation of your code, you have to use doxygen-style commenting. You can use this for all kinds of code like: classes, functions, variables, and many more.
/**
 * @brief add a book to the library database
 *
 * @param lib library
 * @param title title of the book
 * @return book const* pointer to the added book, NULL if invalid
 */
book const *library_add_book(library *lib, const char title[]);If you want to automatically generate the documentation and publish it to your GitHub Pages you have to enable them:
- go to your repository ➡️ settings ➡️ Pages
- enable GitHub Actions to deploy the page

- create a workflow to deploy the documentation

|
|
|

Read the docs
Install OpenCV to your codespace by editing your Dockerfile:
sudo apt-get install -y libopencv-dev(Check this link for installation on Mac ➡️ brew install opencv)
# search for module opencv
find_package( OpenCV ) # alternative: find_package( OpenCV REQUIRED )
# continue only if opencv is found
if(OpenCV_FOUND)
    # add executable for opencv hello world
    add_executable(opencv_hello src/hello_world.cpp)
    # include and link all opencv stuff
    target_include_directories(opencv_hello PUBLIC ${OpenCV_INCLUDE_DIRS} )
    target_link_libraries( opencv_hello ${OpenCV_LIBRARIES})
endif()#include "opencv2/highgui/highgui.hpp"
#include "opencv2/opencv.hpp"
auto main() -> int
{
// initialize a 120X350 matrix with 3 channels of black pixels:
cv::Mat output = cv::Mat::zeros(120, 350, CV_8UC3);
// write text on the matrix:
cv::putText(output, "Hello World :)", cv::Point(15, 70), cv::FONT_HERSHEY_PLAIN, 3, cv::Scalar(0, 255, 0), 4);
// write the resulting image to file
cv::imwrite(std::string(OUTPATH) + "/opencv_hello.jpg", output);
return 0;
}❔ Where is OUTPATH coming from:grey_question: :arrow_right: It is a Compiler Definition from CMake
target_compile_definitions(opencv_hello PRIVATE OUTPATH="${CMAKE_CURRENT_BINARY_DIR}")Write a small opencv application to calculate the canny edges
- Read in an image as greyscale from the hard drive.
- use cv::imread
- use a compiler definition to define the path to the image folder
- Create a new Mat for the edges image
- Calculate the canny edges using cv::Canny
- Put the text Canny Edges into the edge image
- Write the edge image to a file into the build folder
You can find the code for this exercise in the file canny_edges.cpp
If you want to get closed contours from a binary or edge image corresponding to the official tutorial, you can take a look at the contours example
Using the CvPlot library, create a simple plot like:

- Add the CvPlot library to the CMakeLists.txt using the FetchContent module
- you can copy the solution from here
- also remember to link the correct libraries (CvPlot is based on OpenCV) and to add the include folders
- Create a diagram like in the image above
- Also add the title and the axis labels
- When including the CvPlot headers take into account the hint for using CvPlot as header only library
☝️ The documentation and the tutorial will help you. You can find the code for this exercise in the file hello_world.cpp.
Using the Rapidcsv library to read in this csv (Comma Separated Values) file.
- Add the Rapidcsv library to the CMakeLists.txt using the FetchContent module
- you can copy the solution from here
- also remember to link the correct libraries and to add the include folders
- Print out the number of elements in the column Close.
- Print out the value of the volume on 2017-02-22
☝️ The documentation and the examples will help you. You can find the code for this exercise in the file read_csv.cpp.
The National Oceanic And Atmospheric Administration (NOAA) provides extensive weather statistics from all over the world. We want to use the Global Summary of the Year dataset for the weather station in Konstanz. Using the dataset, we want to create a diagram for the average, the maximum and the minimum temperature of the year in Konstanz as shown on the next slide.

<style scoped> section{ font-size: 28px; } </style>
- Download the dataset and the corresponding documentation.
- Use the Rapidcsv library to read in the dataset
- Use the CvPlot library to draw the diagram from above. It should contain:
- Average, maximum, and minimum temperature over years in Konstanz
- Axis labels and title
- ⭐ [Advanced Level]: create a custom drawable to add a certain legend to the plot using basic OpenCV functions. An example is given in the tutorial section.
- ⭐⭐[Pro Level]: create a custom drawable class which allows you to add a legend to the plot. Create the class in a generic manner which allows to add legend entries one after another.
You can find the code for this exercise in the file weather_analysis.cpp
The nature of a measurement is it's uncertainty. We want to read in a point a list of measurements from a csv file and calculate some statistics for it. We are interested in the mean, the variance, and the covariances. Finally we want to visualize the point cloud and it's uncertainty ellipse. How such a visualization looks like is depicted in the following diagram.

<style scoped> section{ font-size: 28px; } </style>
- Use the Rapidcsv library to read in the measurements from the csv file
- Use the CvPlot library to draw the diagram
- Use the armadillo
 library for matrix operations (e.g. mean, covariance, ...)
 - Draw the main axes of the uncertainty ellipse of the covariance matrix
- The eigenvectors give the directions of the main axes
- The eigenvalues are the length of the main axes
- create a custom drawable to draw the ellipse itself.

You can find the code for this exercise in the file uncertainty_ellipse.cpp
